Table 表格组件
ol-table 组件支持与 Swagger API 集成,自动生成表头和搜索项,极大提升开发效率。
效果图
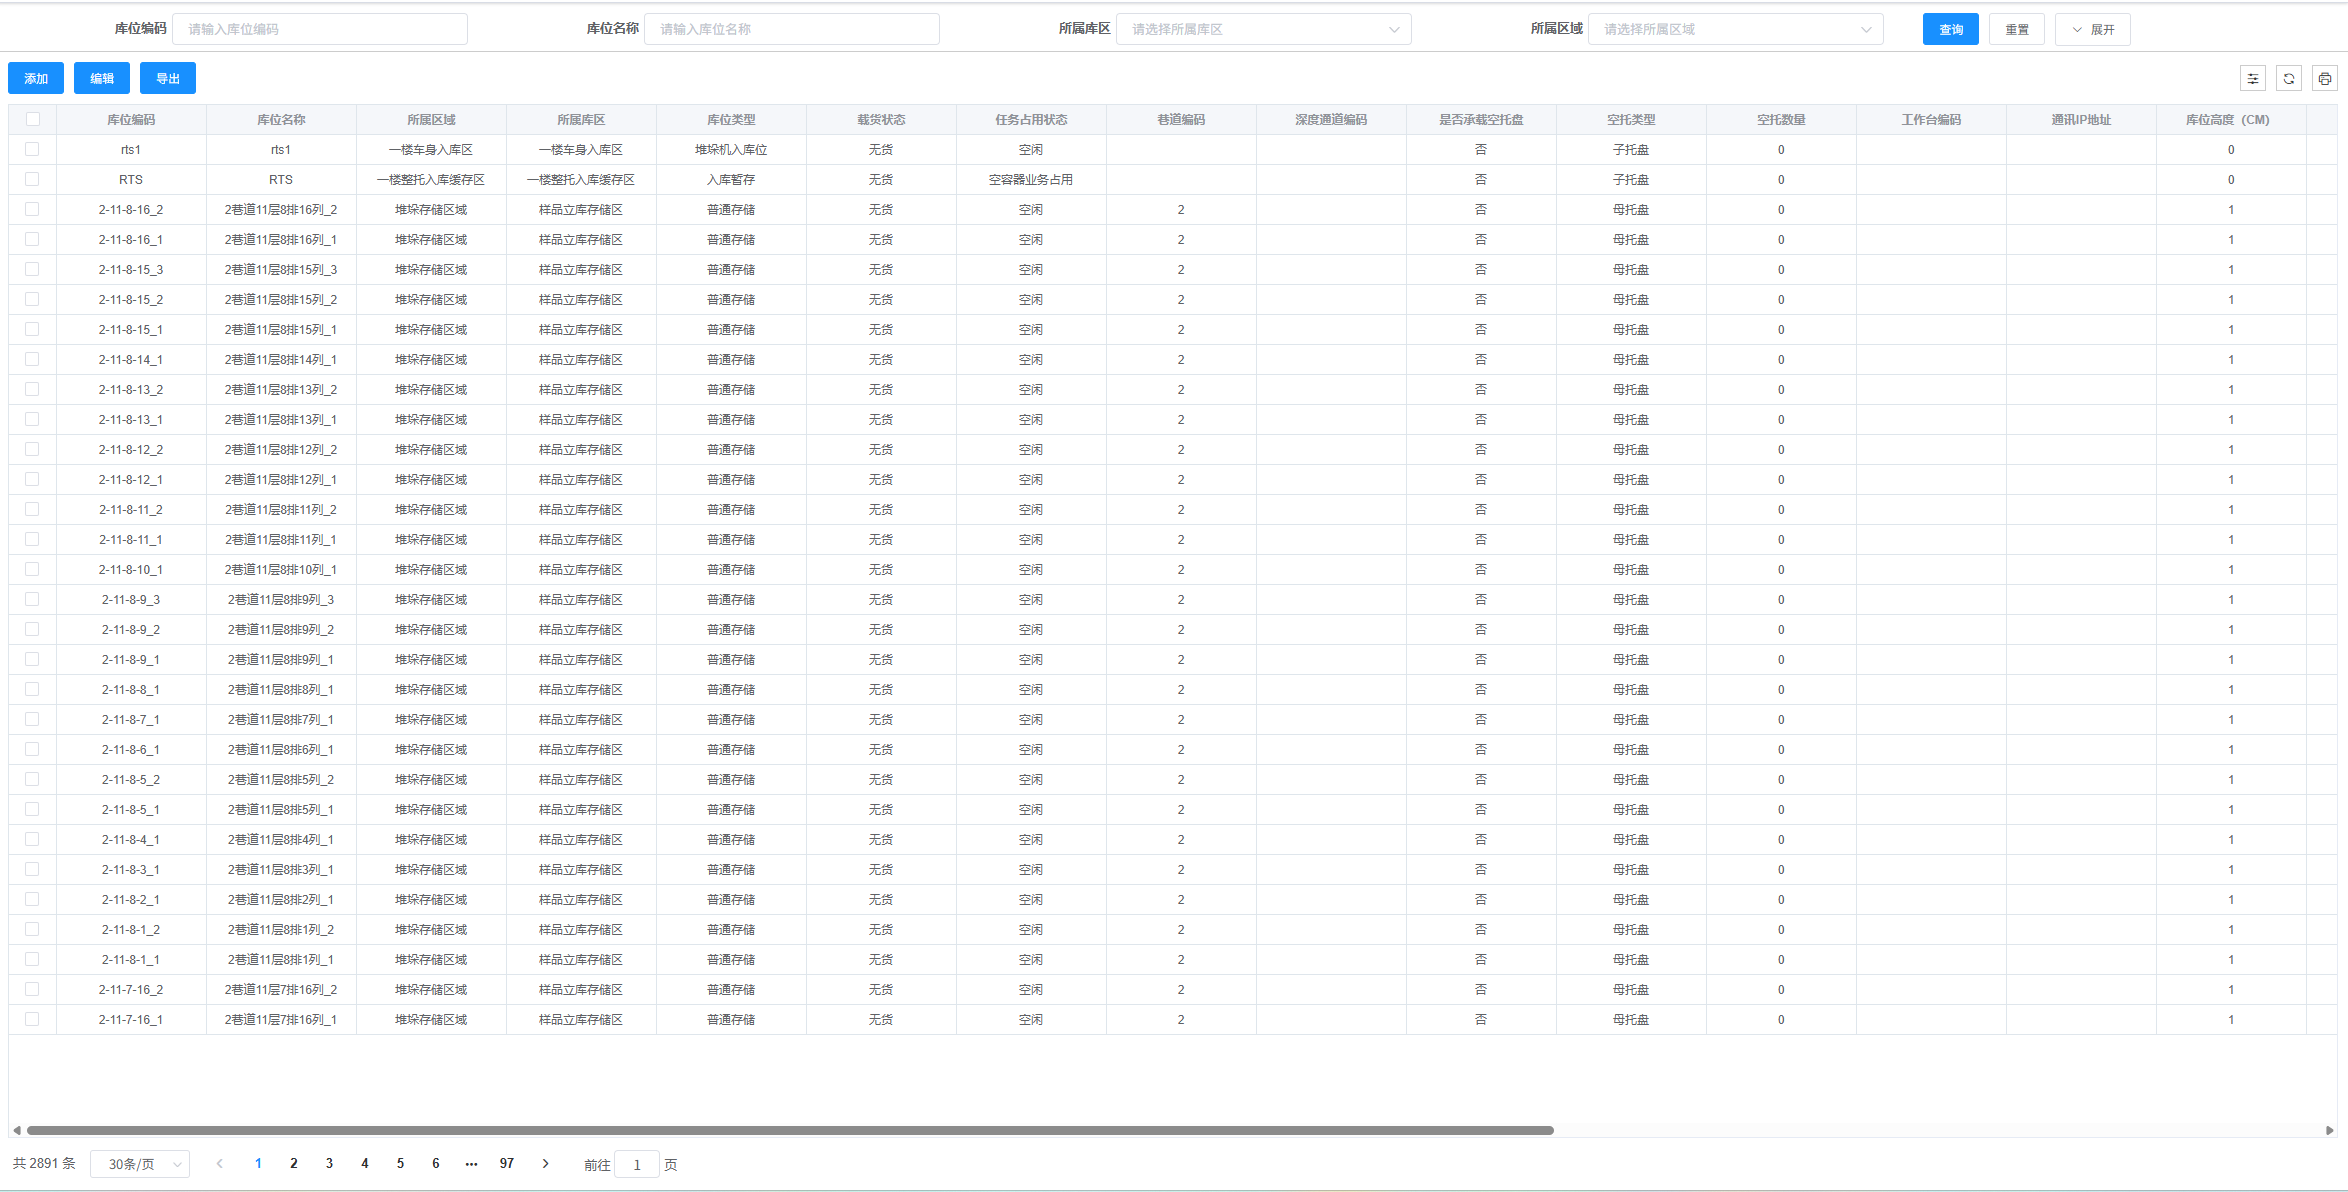
基础用法
使用 Swagger 自动生成表头
** 参数说明:**
url:分页接口地址,用于获取 Swagger 配置和调用分页 API 接口
vue
<template>
  <div>
    <ol-search
      :url="swaggerUrl.getStockStockhistorypages"
      :form-search-data="formSearchData"
      @handleSearch="handleSearch"
      @handleReset="handleReset"
    />
    <ol-table
      :url="swaggerUrl.getStockStockhistorypages"
      :paginations="paginations"
      :btnlist="this.hasBtn(this)"
      :empty-img="tableData.emptyImg"
      :table-data="tableData"
      :multiple-selection="multipleSelection"
      @SelectionChange="SelectionChange"
      @handleSizeChange="handleSizeChange"
      @handleindexChange="handleindexChange"
    />
  </div>
</template>

<script>
import { getStockStockhistorypages } from "@/api/modules";
import { Stock } from "@/api/swagger";

export default {
  data() {
    return {
      swaggerUrl: Stock,
      multipleSelection: [],
      // 查询表单
      formSearchData: {
        reset: true, // 重置
        expendShow: true, // 展开
        value: {},
        tableSearch: [],
      },
      // 表格数据
      tableData: {
        loading: false,
        emptyImg: true,
        options: {
          selection: true,
          index: null,
          headTool: true,
          refreshBtn: true,
          downloadBtn: true,
        },
        rows: [],
        columns: [],
        operatesAttrs: {},
        operates: [],
      },
      paginations: {
        page: 1,
        total: 10,
        limit: 30,
        pagetionShow: true,
      },
    };
  },
  created() {
    this.init();
  },

  methods: {
    async init() {
      const params = {
        ...this.formSearchData.value,
        Page: this.paginations.page,
        MaxResultCount: this.paginations.limit,
      };
      const { result: { items = [], totalCount = 0 } = {} } =
        await getStockStockhistorypages(params, {
          isLoading: true,
        });
      this.tableData.rows = items;
      this.paginations.total = totalCount;
      this.tableData.emptyImg = true;
    },
    handleSearch(from) {
      this.formSearchData.value = { ...from };
      this.paginations.page = 1;
      this.init();
    },
    handleReset() {
      for (let key in this.formSearchData.value) {
        this.formSearchData.value[key] = null;
      }
      this.paginations.page = 1;
    },
    SelectionChange(row) {
      this.multipleSelection = row;
    },
    handleSizeChange(val) {
      this.paginations.page = 1;
      this.paginations.limit = val;
      this.init();
    },
    handleindexChange(val) {
      this.paginations.page = val;
      this.init();
    },
    export() {
      let timer = this.formSearchData.value.createdTime;
      this.formSearchData.value.BeginTime = timer ? timer[0] : "";
      this.formSearchData.value.EndTime = timer ? timer[1] : "";
      this.post({
        url: Stock.postStockExportstockhistory,
        isLoading: true,
        responseType: "blob",
        data: Object.assign(this.formSearchData.value, {
          Page: this.paginations.page,
          MaxResultCount: this.paginations.limit,
        }),
      }).then((res) => {
        this.fnexsl(res);
      });
    },
  },
};
</script>
自定义列配置
虽然 Swagger 会自动生成表头,但你仍然可以自定义列配置:
vue
<template>
  <ol-table
    :url="swaggerUrl.getUserList"
    :table-data="tableData"
    :paginations="paginations"
  >
    <!-- 自定义列内容 -->
    <template #status="{ row }">
      <el-tag :type="row.status === 'Active' ? 'success' : 'danger'">
        {{ row.status === "Active" ? "启用" : "禁用" }}
      </el-tag>
    </template>

    <template #avatar="{ row }">
      <el-avatar :src="row.avatar" />
    </template>
  </ol-table>
</template>

<script>
import { UserApi } from "@/api/swagger";

export default {
  data() {
    return {
      swaggerUrl: UserApi,
      tableData: {
        loading: false,
        options: {
          selection: true,
          headTool: true,
        },
        rows: [],
        columns: [
          // 自定义列配置,会与 Swagger 生成的列合并
          {
            prop: "status",
            label: "状态",
            show: true,
            renderSlot: true, // 使用插槽渲染
          },
          {
            prop: "avatar",
            label: "头像",
            show: true,
            renderSlot: true, // 使用插槽渲染
          },
          // 添加操作列
          {
            prop: "action",
            label: "操作",
            show: true,
            render: (row) => {
              return `<el-button size="small" onclick="editUser(${row.id})">编辑</el-button>`;
            },
          },
        ],
        operates: [
          {
            label: "编辑",
            type: "text",
            method: (row) => this.editUser(row),
          },
          {
            label: "删除",
            type: "text",
            method: (row) => this.deleteUser(row),
          },
        ],
      },
      paginations: {
        page: 1,
        total: 0,
        limit: 20,
        pagetionShow: true,
      },
    };
  },
  methods: {
    editUser(row) {
      console.log("编辑用户:", row);
    },
    deleteUser(row) {
      console.log("删除用户:", row);
    },
  },
};
</script>
多级表头配置
支持在 Swagger 自动生成的基础上添加多级表头:
vue
<template>
  <ol-table
    :url="swaggerUrl.getUserList"
    :table-data="tableData"
    :paginations="paginations"
  />
</template>

<script>
import { UserApi } from "@/api/swagger";

export default {
  data() {
    return {
      swaggerUrl: UserApi,
      tableData: {
        loading: false,
        options: {
          selection: true,
          headTool: true,
        },
        rows: [],
        columns: [
          // 多级表头配置
          {
            label: "基本信息",
            show: true,
            children: [
              { prop: "name", label: "姓名", show: true },
              { prop: "email", label: "邮箱", show: true },
            ],
          },
          {
            label: "详细信息",
            show: true,
            children: [
              { prop: "phone", label: "电话", show: true },
              { prop: "address", label: "地址", show: true },
            ],
          },
          // 其他列会从 Swagger 自动生成
        ],
      },
      paginations: {
        page: 1,
        total: 0,
        limit: 20,
        pagetionShow: true,
      },
    };
  },
};
</script>
效果图

动态列显示控制
通过 beforeProp 属性控制多级表头的位置:
vue
<template>
  <ol-table
    :url="swaggerUrl.getUserList"
    :table-data="tableData"
    :paginations="paginations"
  />
</template>

<script>
import { UserApi } from "@/api/swagger";

export default {
  data() {
    return {
      swaggerUrl: UserApi,
      tableData: {
        loading: false,
        options: {
          selection: true,
          headTool: true,
        },
        rows: [],
        columns: [
          // 这个多级表头会插入到 name 字段之后
          {
            label: "联系信息",
            beforeProp: "name",
            show: true,
            children: [
              { prop: "phone", label: "电话", show: true },
              { prop: "email", label: "邮箱", show: true },
            ],
          },
          // 这个多级表头会插入到 status 字段之后
          {
            label: "扩展信息",
            beforeProp: "status",
            show: true,
            children: [
              { prop: "department", label: "部门", show: true },
              { prop: "position", label: "职位", show: true },
            ],
          },
        ],
      },
      paginations: {
        page: 1,
        total: 0,
        limit: 20,
        pagetionShow: true,
      },
    };
  },
};
</script>
完整示例
vue
<template>
  <div>
    <!-- 搜索组件 -->
    <ol-search
      :url="swaggerUrl.getUserList"
      :form-search-data="formSearchData"
      @handleSearch="handleSearch"
      @handleReset="handleReset"
    />

    <!-- 表格组件 -->
    <ol-table
      :url="swaggerUrl.getUserList"
      :table-data="tableData"
      :paginations="paginations"
      :btnlist="btnlist"
      :multiple-selection="multipleSelection"
      @SelectionChange="SelectionChange"
      @handleSizeChange="handleSizeChange"
      @handleindexChange="handleindexChange"
      @rowClick="handleRowClick"
    >
      <!-- 自定义列内容 -->
      <template #status="{ row }">
        <el-tag :type="row.status === 'Active' ? 'success' : 'danger'">
          {{ row.status === "Active" ? "启用" : "禁用" }}
        </el-tag>
      </template>

      <template #avatar="{ row }">
        <el-avatar :src="row.avatar" />
      </template>
    </ol-table>
  </div>
</template>

<script>
import { UserApi } from "@/api/swagger";

export default {
  data() {
    return {
      swaggerUrl: UserApi,
      multipleSelection: [],
      formSearchData: {
        reset: true,
        expendShow: false,
        value: {},
        tableSearch: [], // 会自动从 Swagger 生成
      },
      tableData: {
        loading: false,
        options: {
          selection: true,
          index: true,
          headTool: true,
          refreshBtn: true,
          downloadBtn: true,
        },
        rows: [],
        columns: [
          // 自定义列配置
          {
            prop: "status",
            label: "状态",
            show: true,
            renderSlot: true,
          },
          {
            prop: "avatar",
            label: "头像",
            show: true,
            renderSlot: true,
          },
          // 多级表头
          {
            label: "联系信息",
            beforeProp: "name",
            show: true,
            children: [
              { prop: "phone", label: "电话", show: true },
              { prop: "email", label: "邮箱", show: true },
            ],
          },
        ],
        operates: [
          {
            label: "查看",
            type: "text",
            icon: "el-icon-view",
            method: (row) => this.viewUser(row),
          },
          {
            label: "编辑",
            type: "text",
            icon: "el-icon-edit",
            method: (row) => this.editUser(row),
          },
          {
            label: "删除",
            type: "text",
            icon: "el-icon-delete",
            method: (row) => this.deleteUser(row),
          },
        ],
        operatesAttrs: {
          width: "200px",
          fixed: "right",
        },
      },
      paginations: {
        page: 1,
        total: 0,
        limit: 20,
        pagetionShow: true,
      },
      btnlist: [
        {
          title: "新增",
          types: "primary",
          icon: "el-icon-plus",
          method: () => this.addUser(),
        },
        {
          title: "批量删除",
          types: "danger",
          icon: "el-icon-delete",
          method: () => this.batchDelete(),
        },
      ],
    };
  },
  methods: {
    async handleSearch(formData) {
      const params = {
        ...formData,
        Page: this.paginations.page,
        MaxResultCount: this.paginations.limit,
      };

      try {
        this.tableData.loading = true;
        const { result } = await this.swaggerUrl.getUserList(params);
        this.tableData.rows = result.items || [];
        this.paginations.total = result.totalCount || 0;
      } catch (error) {
        console.error("获取数据失败:", error);
        this.$message.error("获取数据失败");
      } finally {
        this.tableData.loading = false;
      }
    },
    handleReset() {
      this.paginations.page = 1;
      this.getTableData();
    },
    handleSizeChange(val) {
      this.paginations.limit = val;
      this.paginations.page = 1;
      this.getTableData();
    },
    handleindexChange(val) {
      this.paginations.page = val;
      this.getTableData();
    },
    SelectionChange(selection) {
      this.multipleSelection = selection;
      console.log("选中的数据:", selection);
    },
    handleRowClick(row) {
      console.log("点击行:", row);
    },
    viewUser(row) {
      console.log("查看用户:", row);
    },
    editUser(row) {
      console.log("编辑用户:", row);
    },
    deleteUser(row) {
      this.$confirm("确认删除该用户吗?", "提示", {
        confirmButtonText: "确定",
        cancelButtonText: "取消",
        type: "warning",
      })
        .then(() => {
          console.log("删除用户:", row);
          this.$message.success("删除成功");
        })
        .catch(() => {
          this.$message.info("已取消删除");
        });
    },
    addUser() {
      console.log("新增用户");
    },
    batchDelete() {
      if (this.multipleSelection.length === 0) {
        this.$message.warning("请选择要删除的数据");
        return;
      }
      console.log("批量删除:", this.multipleSelection);
    },
    async getTableData() {
      await this.handleSearch(this.formSearchData.value);
    },
  },
  mounted() {
    this.getTableData();
  },
};
</script>
API 说明
Swagger 相关属性
| 参数 | 说明 | 类型 | 可选值 | 默认值 |
|---|---|---|---|---|
url | Swagger API 地址,用于自动生成表头和搜索项 | string | — | — |
swaggerColumnsProcessor | 获取到 swagger 的钩子,需要 return 处理后的 swagger 结构数据。一般用于特殊处理 swagger 数据 | function | — | — |
mergedColumnsProcessor | swagger 与本地 columns 合并完成后的钩子,用于需要修改 columns 属性的需求。属性修改不影响顺序,区别于直接 column 中直接添加 | function | — | — |
自动生成规则
- 表头生成:根据 Swagger API 响应数据的
schema自动生成表头 - 搜索项生成:根据 Swagger API 请求参数的
schema自动生成搜索项 - 字段映射:
prop字段与 Swagger 中的字段名对应 - 标签映射:
label字段使用 Swagger 中的description或字段名 - 类型推断:根据 Swagger 中的数据类型自动设置输入类型
注意事项
- Swagger 初始化:确保在组件使用前已调用
swaggerInstall() - API 路径:
url属性需要与 Swagger 文档中的路径一致 - 数据格式:确保 API 返回的数据格式符合分页结构
{ items: [], totalCount: number } - 字段覆盖:自定义的
columns配置会覆盖 Swagger 自动生成的配置 - 多级表头:
beforeProp属性用于控制多级表头的位置,仅支持一级表头
最佳实践
- 统一管理:将 Swagger URL 统一管理在
api/swagger.js中 - 错误处理:在 API 调用中添加适当的错误处理
- 加载状态:使用
loading属性显示加载状态 - 数据验证:在数据获取后验证数据格式
- 性能优化:合理使用分页和搜索,避免一次性加载大量数据